Usb Folder Upload From Camera Wont Work
How to Import Photos with Windows 10
The built-in software in Windows 10 easily fetches photos from near any make and model of digital photographic camera, too as nigh smartphones. It even lets you grouping your camera's photograph sessions into unlike folders, each named after the event.
Although these steps work for most digital cameras and Android smartphones, iPhone owners must go through iTunes to re-create their photos to their computer.
To import photos from your camera or smartphone into your computer, follow these steps:
-
Plug the phone or photographic camera's cable into your computer.
Almost cameras come with two cables: one that plugs into your TV set for viewing, and some other that plugs into your computer. You need to find the one that plugs into your computer for transferring photos. (With smart phones, your USB charging cable handles the task.)
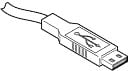
Plug the transfer cable's minor end into your photographic camera or smartphone, and plug the larger end (shown here) into your computer'due south USB port, a rectangular-looking pigsty about 1/2-inch long and ane/4-inch high. USB ports live on the dorsum of the older computers, along the forepart of newer computers, and along the sides of laptops and tablets.
If the USB plug doesn't want to fit into the port, turn over the plug and try once again. (It fits only one mode.)
-
Turn on your phone or camera (if it'south non already turned on) and await for File Explorer to recognize it.

Open File Explorer from the taskbar along the bottom of your screen and click the This PC icon from the program's left border. File Explorer lists all of the storage devices available to your PC, including your photographic camera or phone.

When recognized, your camera appears as an icon (shown in the margin) in File Explorer'due south This PC section.

If you plug in an Android smartphone, be certain to tell it to connect in "Photographic camera Mode" manner rather than "Media Device" mode. Your phone appears as an icon (shown here).
If Windows doesn't recognize your camera, make sure that the camera is set to display mode — the manner where you lot can see your photos on the camera'southward brandish. If you all the same have issues, unplug the cablevision from your computer, wait a few seconds, and then plug information technology back in.
-
Right-click your photographic camera or phone, choose Import Pictures and Videos from the popular-upward card, and choose how to import your photos.
The Import Pictures and Videos window, shown in the following figure, offers two options for handling your newly recognized digital photographic camera or smartphone:
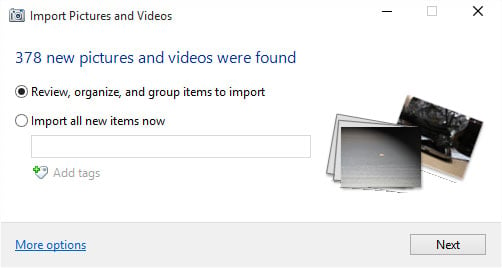
The Import Pictures and Videos window offers to copy your photographic camera'southward files to your computer.
-
Review, Organize, and Group Items to Import: Designed for cameras property photos from several sessions, this option lets you lot sort your photos into groups, copying each group to a different folder. Information technology takes more than time, but information technology's a handy way to split up your Hawaiian vacation photos into folders named after each island. If you prefer this choice, move to Step v.
-
Import All New Items At present: Designed for cameras holding only 1 photograph session, this much simpler approach copies every photo into 1 folder. If you choose this option, motility to Stride 4.
Clicking the words More Options, shown in the bottom left of the effigy, lets you change where Windows places your imported photos, as well as whether Windows should delete them from the camera after importing them. It'due south worth a wait-see because information technology lets you undo any options you've mistakenly called when importing your previous batch of photos.
-
-
Select the Import All New Items Now option, type a short description into the Add Tags box, and click Next.
Blazon a descriptive give-and-take into the Add Tags box — Hawaii Trip, for example — and click Adjacent. Windows copies everything into a folder named after the appointment and the word "Hawaii Trip." It also names every file "Hawaii Trip 001," "Hawaii Trip 002," and then on. You're washed! To see your photos, open your Pictures folder and expect for your newly named binder.
Adding a descriptive word or phrase makes your photos much easier to notice later. To fetch them, type their tag into the Start card'due south Search box, and Windows lists them all.
-
Click the Review, Organize, and Group items to Import button, and click the Next button.
Windows examines the time and date you snapped each of your photos. Then the program tentatively separates your photos into groups for your approval, as shown here.
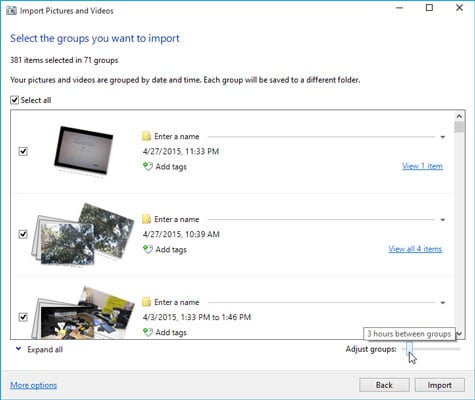
Windows offers groups of pictures based on the time and date you took them. Y'all can review and modify the groups before importing.
-
Arrange the fourth dimension grouping, if necessary, to keep related photos in the same identify.
Don't like the Windows choice of groups? And then change them by sliding the Adjust Groups bar to the left or right. Slide to the left for lots of small groups, sorted by every half-hour you snapped a photo. Keep sliding to the right for fewer groups. Slide to the uttermost right, and Windows places everything into one group, significant they all go into one folder.
Tin can't remember what'south in a group of photos? Click the words View All Items to the left of each group. That lets you view the photos and decide whether they're important enough to warrant their own binder.
-
Approve the chosen groups, proper noun the groups' folders, add descriptive tags, and then click the Import button.
Name each group by clicking the words Enter a Proper noun and and then typing a descriptive title. The title becomes the new binder's name.
In the Add together Tags area for each group, type in descriptive words nearly the photo session, separating each word with a semicolon. By tagging your photos, y'all can easily notice them later with the Windows Search programme.
Later you've named the groups and added tags, click the Import button to terminate the job.
If you don't delete your camera'southward photos afterwards Windows copies them into your estimator, you lot won't have room to take more photos. As Windows begins grabbing your photos, y'all tin can select the Erase after Importing check box, shown hither. That tells Windows to erase the camera's photos, saving you the trouble of manually deleting them with your camera'due south awkward menus.
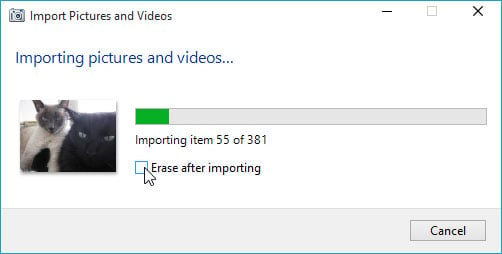
If desired, select the Erase after Importing check box to free up space on your camera for more photos.
When Windows finishes importing your photos, it displays the folder containing your new pictures.
Most This Article
This article can exist found in the category:
- Windows 10 ,
Source: https://www.dummies.com/computers/operating-systems/windows-10/how-to-import-photos-with-windows-10/
0 Response to "Usb Folder Upload From Camera Wont Work"
Post a Comment